What is Antiforgery Token and How to use it in ASP.NET MVC?

Example Code: https://drive.google.com/file/d/1wc0fpPUD-pDI4fRB6dLIX4BxsDoIH5VC/view?usp=sharing
To help prevent CSRF attacks, ASP.NET MVC uses anti-forgery tokens, also called request verification tokens. It verifies the tokens before accepting the request into ASP.NET MVC controller action which prevents the Cross Site Request Forgery.
What is CRF?
Cross-Site Request Forgery (CSRF) is an attack where a malicious site sends a request to a vulnerable site. Here use can send request and data to ASP.NET MVC controller actions from dummy websites or from automated robots.
How Anti forgery token works?
It is two way process where in one step it will –
- The client requests an HTML page that contains a form.
- The server includes two tokens in the response. One token is sent as a cookie. The other is 3. placed in a hidden form field. The tokens are generated randomly so that an adversary cannot guess the values.
- When the client submits the form, it must send both tokens back to the server. The client sends 4. the cookie token as a cookie, and it sends the form token inside the form data. (A browser 5. client automatically does this when the user submits the form.)
If a request does not include both tokens, the server disallows the request.
Create a ASP.NET MVC 5 Application with test controller, create with http get and post without anti forgery token as follows –
Action Code:-
[HttpGet]
public ActionResult Create()
{
    return View();
}

[HttpPost]
public ActionResult Create(CustomerVM rec)
{
 if (ModelState.IsValid)
  {
    ///save record
    return RedirectToAction("Index");
   }

    return View(rec);
}
View Code :-
@model AntiforgeryTokenEx.Models.CustomerVM
@{
    Layout = null;
}

<!DOCTYPE html>

<html>
<head>
    <meta name="viewport" content="width=device-width" />
    <title>Create</title>
</head>
<body>
    <div>
        <h2> New  Customer </h2>
        @using (Html.BeginForm())
        {
           <div>
                <label>@Html.LabelFor(p => p.CustomerName)</label>
                <div>
                    @Html.EditorFor(p => p.CustomerName)
                </div>
            </div>

            <div>
                <label>@Html.LabelFor(p => p.EmailID)</label>
                <div>
                    @Html.EditorFor(p => p.EmailID)
                </div>
            </div>

            <div>
                <label>@Html.LabelFor(p => p.MobileNo)</label>
                <div>
                    @Html.EditorFor(p => p.MobileNo)
                </div>
            </div>
            <div>
                <input type="submit" value="Save" />
            </div>

        }
    </div>
</body>
</html>
If you run this application it works perfect.
After this create a dummy HTML Page with form and input elements with action attribute of the form set to the actual website url or action url of the controller as follows –
<html>
<head>
 <title> dummy page </title>
</head>
<body>
  <form method="post" action="http://localhost:50660/Test/Create">
    Customer Name: <input type="text" name="CustomerName" /> <br>
    Email ID :<input type="text" name="EmailID" /> <br>
    Mobile No:<input type="text" name="MobileNo" /> <br>
   <input type="submit" value="Save" />
  </form>
</body>
</html>
When you submit the above form you will be get amazed that your action will accept the request and process the data submitted by this form.
Apply AntiForgery Token
Applying antiforgery token is two step process as follows –
- Generate AntiForgery Token by calling AntiForgeryToken helper method from HTML helper class in a form(view) as follows –
@Html.AntiforgeryToken()This method will generate two tokens one will be stored in hidden field with form and another will be stored in cookie inside the browser.
2. Validate AntiForgery token when form is submitted back to server.
You can validate that token using the attribute [ValidateAntiForgeryToken] on the server when form is resubmitted back to the server.
Step by Step Process: –
- Create a new ASP.NET MVC Application using regular steps
- Create a Customer Model as Follows –
  public class Customer
    {
        public Int64 CustomerID { get; set; }
        public string CustomerName { get; set; }
        public string EmailID { get; set; }
        public string MobileNo { get; set; }
    }
3. Create Http Get Action as follows –
[HttpGet]
public ActionResult Create()
{
 return View();
}
4. Write a code for Create View as follows –
@model AntiForgeryTokenHelperEx.Models.Customer

@{
    Layout = null;
}

<!DOCTYPE html>

<html>
<head>
    <meta name="viewport" content="width=device-width" />
    <title>Create</title>
</head>
<body>


    @using (Html.BeginForm())
    {
         @Html.AntiForgeryToken()

        <div class="form-horizontal">
            <h4>Customer</h4>
            <hr />
            @Html.ValidationSummary(true, "", new { @class = "text-danger" })
            <div class="form-group">
                @Html.LabelFor(model => model.CustomerName, htmlAttributes: new { @class = "control-label col-md-2" })
                <div class="col-md-10">
                    @Html.EditorFor(model => model.CustomerName, new { htmlAttributes = new { @class = "form-control" } })
                    @Html.ValidationMessageFor(model => model.CustomerName, "", new { @class = "text-danger" })
                </div>
            </div>

            <div class="form-group">
                @Html.LabelFor(model => model.EmailID, htmlAttributes: new { @class = "control-label col-md-2" })
                <div class="col-md-10">
                    @Html.EditorFor(model => model.EmailID, new { htmlAttributes = new { @class = "form-control" } })
                    @Html.ValidationMessageFor(model => model.EmailID, "", new { @class = "text-danger" })
                </div>
            </div>

            <div class="form-group">
                @Html.LabelFor(model => model.MobileNo, htmlAttributes: new { @class = "control-label col-md-2" })
                <div class="col-md-10">
                    @Html.EditorFor(model => model.MobileNo, new { htmlAttributes = new { @class = "form-control" } })
                    @Html.ValidationMessageFor(model => model.MobileNo, "", new { @class = "text-danger" })
                </div>
            </div>

            <div class="form-group">
                <div class="col-md-offset-2 col-md-10">
                    <input type="submit" value="Create" class="btn btn-default" />
                </div>
            </div>
        </div>
    }

    <div>
        @Html.ActionLink("Back to List", "Index")
    </div>
</body>
</html>
Create Http Post Action to Validate Antiforgery token as follows –
[HttpPost]
[ValidateAntiForgeryToken]
public ActionResult Create(Customer rec)
{
return View();
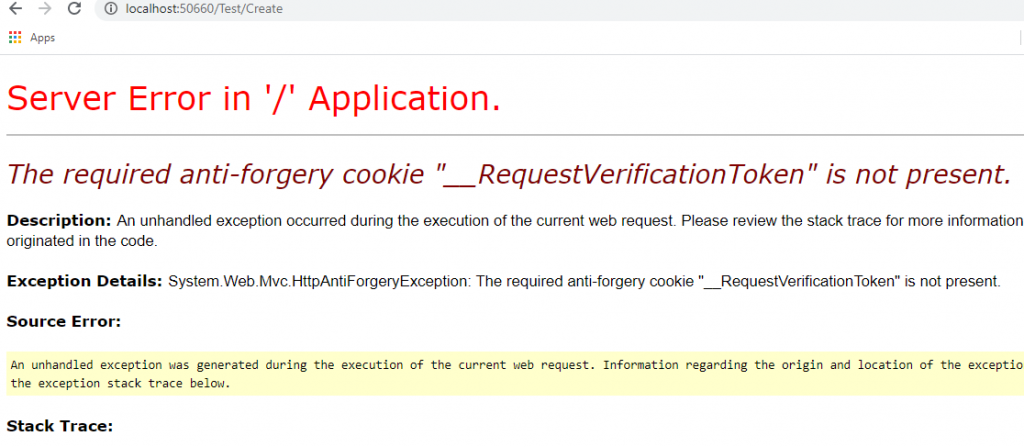
}Now run the application and use it will run perfect.
After this if you open the dummy html page and try to submit the form it will not allow you to submit the form it will complain you about the anti forgery token helper as follows –