Entity Framework Code First Approach using ASP.NET MVC 5
Example Link: https://drive.google.com/file/d/1G5oroBmfsy30_avDAlZrsy27KGPCBGRl/view?usp=sharing
What is Code-First?
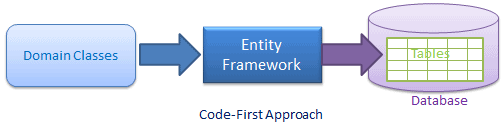
In the Code-First approach, you focus on the domain of your application and start creating classes for your domain entity rather than design your database first and then create the classes which match your database design. The following figure illustrates the code-first approach.
The Code First Approach provides an alternative to the Database First and Model First approaches to the Entity Data Model and creates a database for us based on our classes that we will be creating in this article.
- Code First modeling workflow targets a database that doesn’t exist and Code First will create it.
- It can also be used if you have an empty database and then Code First will add new tables to it.
- Code First allows you to define your model using C# or VB.Net classes.
- Additional configuration can optionally be performed using attributes on your classes and properties or by using a Data Annotations.
Code First can be used using following steps –
- Create Domain /Model Classes
- Configure them using Data Annotation Attributes
- Define a context class to create the collections of type dbset
- Use it , it will generate the database.
- After generation of database if you do some modification in domain/model classes then it will be reflected using migrations.

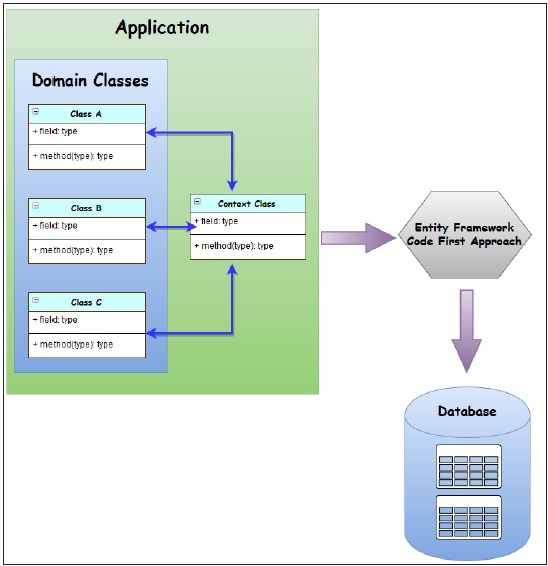
Pictorially it will look like as follows –
Let us do it step by step.
- Create ASP.NET MVC 5 Web Application.
In this step we will create ASP.NET MVC application as we created in previous applications.
2.Create the Domain Classes
In this step we define all the domain classes in Models folder of your application as follows –
public class Area
{
  public Int64 AreaID { get; set; }
  public string AreaName { get; set; }
  public virtual List<Dept> AreaDepts { get; set; }
}
public class Dept
{
public Int64 DeptID { get; set; }
public string DeptName { get; set; }
public Int64 AreaID { get; set; }
public virtual List<Emp> DeptEmps { get; set; }
public virtual Area DeptArea { get; set; }
}public class Emp
{
[Key]
public Int64 EmpID { get; set; }
public string EmpName { get; set; }
public string Address { get; set; }
public string EmailID { get; set; }
public string MobileNo { get; set; }
public decimal Salary { get; set; }
public Int64 DeptID { get; set; }
public virtual Dept EmpDept { get; set; }
}3. Decorate those classes using data annotation attributes
Conventions are sets of default rules which automatically configure a conceptual model based on your domain classes when working with the Code-First approach. Following table shows you few conventions –
| Default Convention For | Description |
|---|---|
| Schema | By default, EF creates all the DB objects into the dbo schema. |
| Table Name | <Entity Class Name> + ‘s’ EF will create a DB table with the entity class name suffixed by ‘s’ e.g. Student domain class (entity) would map to the Students table. |
| Primary key Name | 1) Id 2) <Entity Class Name> + “Id” (case insensitive) EF will create a primary key column for the property named Id or <Entity Class Name> + “Id” (case insensitive). |
| Foreign key property Name | By default EF will look for the foreign key property with the same name as the principal entity primary key name. |
You can override these conventions using data annotations those are as follows –
Table :-
Table is data annotation attribute applied on model class that you want to be part of database. It has following syntax –
[Table("TableName")]It has tablename as parameter it will create the table with name passed as parameter.
Key :-
Is Data annotation attribute can be applied on that field of table on which you want to be primary key or key column.
[Key]So now model classes will look like this –
    [Table("AreaTbl")]
    public class Area
    {
        [Key]
        public Int64 AreaID { get; set; }
        public string AreaName { get; set; }
        public virtual List<Dept> AreaDepts { get; set; }
    }

[Table("DeptTbl")]
public class Dept
{
  [Key]
  public Int64 DeptID { get; set; }
  public string DeptName { get; set;
}

 [Table("EmpTbl")]
    public class Emp
    {
        [Key]
        public Int64 EmpID { get; set; }
        public string EmpName { get; set; }
        public string Address { get; set; }
        public string EmailID { get; set; }
        public string MobileNo { get; set; }
        public decimal Salary { get; set; }

    }
Step 4: Define Relation Ship using Navigation Property
To define the relationship between two classes we can use the virtual navigation property on one class to another class depending of type of relationship you want to create.
If you want to create 1-M relationship where one instance of one class will be related to multiple instance of the another class then we can use 1-M relationship.
e.g. if area class and dept class related with each other where one area object is connected with multiple dept objects it can be created as follows –
[Table("AreaTbl")]
public class Area
{
   [Key]
   public Int64 AreaID { get; set; }
   public string AreaName { get; set; }
   public virtual List<Dept> AreaDepts { get; set; }
}
[Table("DeptTbl")]
public class Dept
{
[Key]
public Int64 DeptID { get; set; }
public string DeptName { get; set; }
public Int64 AreaID { get; set; }
public virtual Area DeptArea { get; set; }
}
In above code will automatically generate the foregin key as per convention. As per convention if you define any virtual navigation property in a class of another class and a field with same data type with same name as the primary key/key property from that class , it will automatically create the foregin key for the same.
Override the Foreign key using [ForeignKey] attribute
This data annotation attribute can be applied on a field or column that you want to be foregin key, it can be used as follows –
[ForeginKey("Propertyname")]Here we apply the [ForeingnKey] attribute on a property that you want to be a foreign key and specify the name of navigation property which is connected with that foreign key you can do it as follows –
[Table("EmpTbl")]
public class Emp
{
[Key]
public Int64 EmpID { get; set; }
public string EmpName { get; set; }
public string Address { get; set; }
public string EmailID { get; set; }
public string MobileNo { get; set; }
public decimal Salary { get; set; }
[ForeignKey("EmpDept")]
public Int64 EDID { get; set; }
public virtual Dept EmpDept { get; set; }
}
Step 5 : Create a context class.
To create a context class add a class to a project by any name and inherit it from DbContext class , for db context class we need a namespace System.Data.Entity and this name space will not be available in your project by default for that we need to install the entity framework in your project. You can install the entity framework in your project by two ways –
- Nuget Package Manager GUI
- Nuget Package Manager Console.
Step 1: Nuget Package Manager GUI follow the following steps –
Right click on your project in the solution explorer and select Manage NuGet Packages…
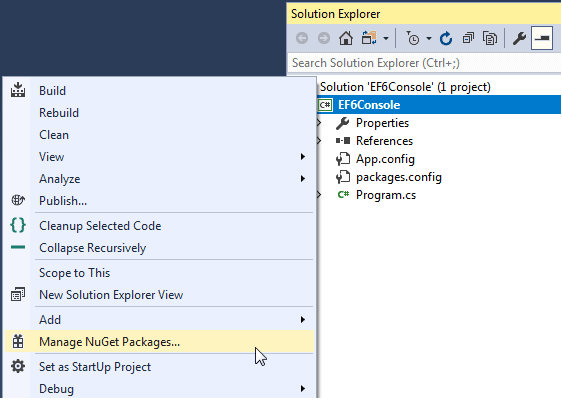
This will open the Manage NuGet Packages dialogue box. Search for EntityFramework in the top left search box and press Enter. It will display all the API/plug-ins starting with EntityFramework as shown below.
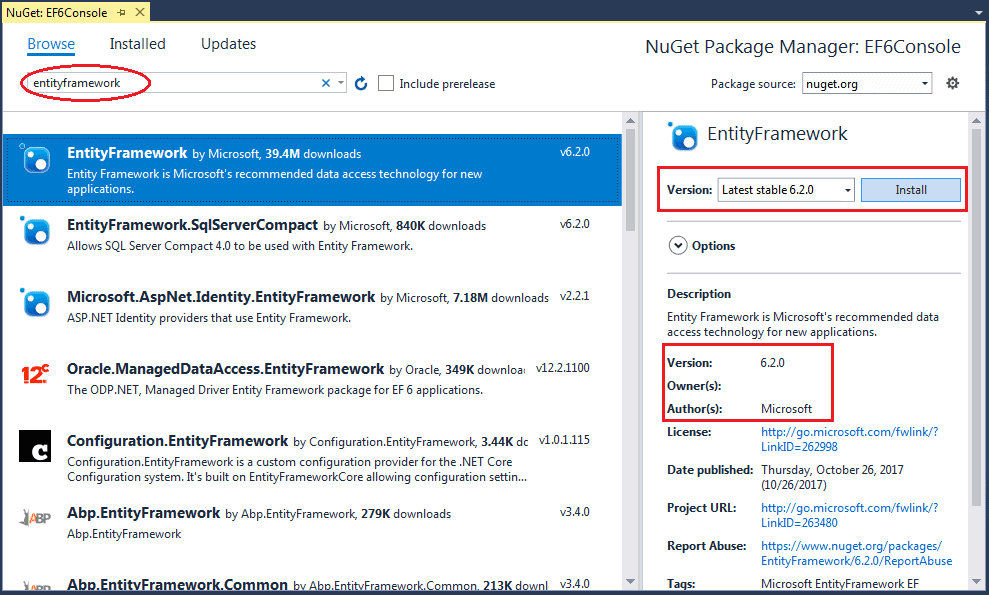
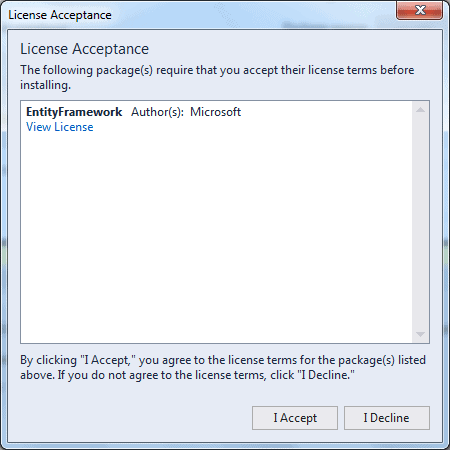
Select EntityFramework (make sure that the author is Microsoft and the version is 6.x) and click on Install. This will open the preview box . Review the changes and click OK. Then it will open accept agreement box just click on accept and it will install the entity framework.
Once you install the entity framework you can use the namespace System.Data.Entity from the DbContext class.
2. Using Nuget Package Manager Console
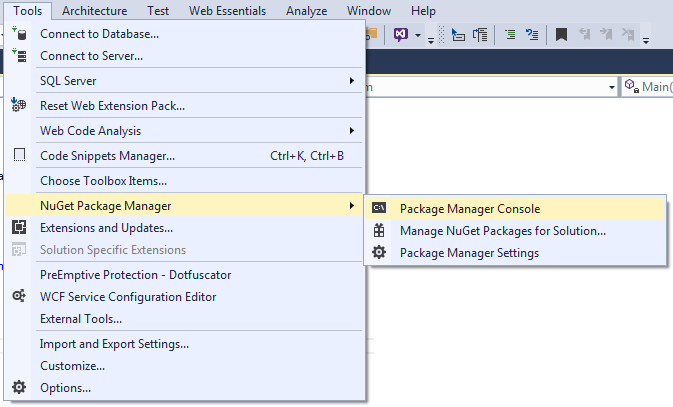
Go to Tools » NuGet Package Manager » Manage NuGet Packages For Solution
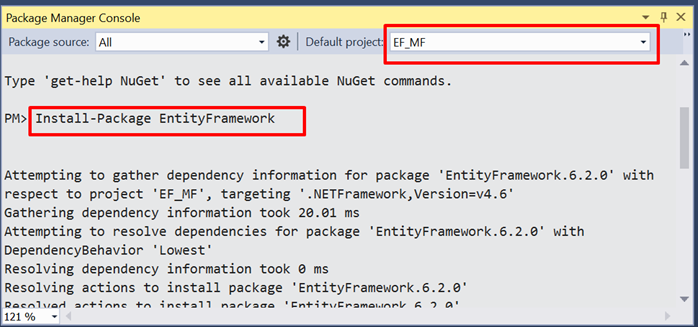
Then it will open the Console in the console you can use two commands –
Install-Package Package Name: – used to install the package, to uninstall the package we need to use command uninstall-pacakge entityframework you can do it as follows –
Once entity framework is installed then you can use the namespace System.Data.Entity namespace.
Step 6: – Create a generic property dbset of type model class in context class for every model class that you want to be table in database and this property will get you access to the rows from that table.
namespace CodeFirstEx.Models
{
public class CompanyContext :DbContext
{
public DbSet<Emp> Emps { get; set; }
public DbSet<Dept> Depts { get; set; }
public DbSet<Area> Areas { get; set; }
}
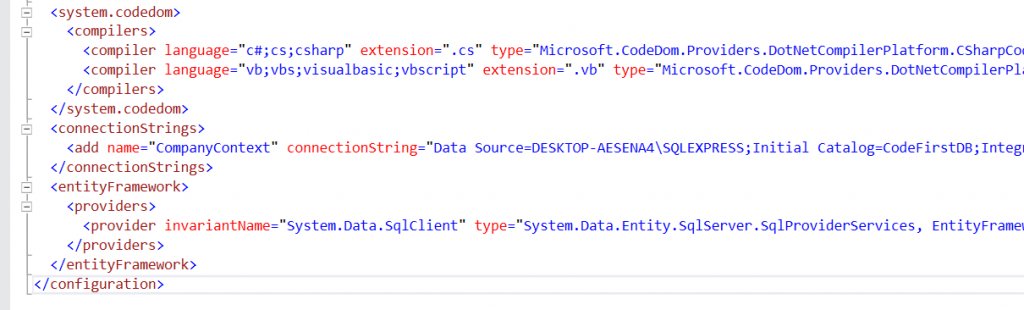
}Step 7: – Create a connection string.
To create a connection string go to web.config file before entityframework tag as follows –
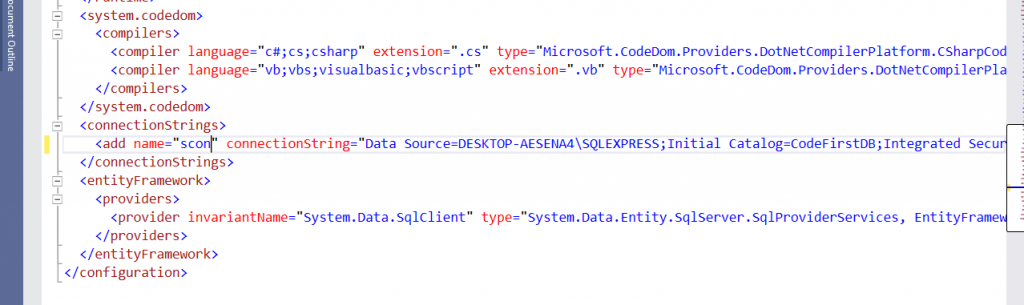
We can have two type of naming conventions for connection string.
First one is pass the connection string as parameter to base class constructor from context class constructor as follows –
 public class CompanyContext :DbContext
    {
        public CompanyContext() : base("name=scon")
        { }

        public DbSet<Emp> Emps { get; set; }
        public DbSet<Dept> Depts { get; set; }
        public DbSet<Area> Areas { get; set; }
    }
Where scon is the name of the connection string.
Second way is name of the context class will be exactly similar to connection string name then it will automatically use that connection string.
Step 7: Use the context class if database is not exists it will create database automatically for you.
public class TestController : Controller
{
  // GET: Test
   CompanyContext cc = new CompanyContext();
    public ActionResult Index()
    {
      return View(cc.Emps.ToList());
   }
}
If you make changes to model classes we need to use database migrations to migrate the changes.
Code First Migration in Entity Framework 6.0
In order to use code-based migration, you need to execute the following commands in the Package Manager Console in Visual Studio:
Enable-Migrations: Enables the migration in your project by creating a Configuration class.
Add-Migration: Creates a new migration class as per specified name with the Up() and Down() methods.
Update-Database: Executes the last migration file created by the Add-Migration command and applies changes to the database schema.
Enable Migrations
To use code-based migrations, first execute the enable-migrations command in the Package Manager Console.
Open the Package Manager Console from Tools → Library Package Manager → Package Manager Console and then run the enable-migrations command (make sure that the default project is the project where your context class is).

It will create Migrations folder where it will keep the code required for the migration.
Add-Migration
After this we need to add Add-Migration which will generate the code for update the changes to database. It will create up and down method to to update and remove the changes from the database. It can be used as follows
Add-Migration 'Migrationname'
Update-Database
It will generate all necessary code in Migrations folder to make the changes to database, but will not be get fired on database to fire it on database, we need to use Update-Database command it can be used as follows –
Update-Database
It will update all pending changes to database.
Roll Back Changes: –
Suppose you want to roll back the database schema to any of the previous states, then you can execute the update-database command with the –TargetMigration parameter to the point which you want to roll back to.
PM> update-database -TargetMigration:NameofTargetMigration